
All Grain BIAB Recipe Small Batch American Pale Ale Recipe

5 Litre (1 Gallon) Brews have become a popular method of all grain brewing for those with limited space. It’s possible to make smaller batches of beer in a small kitchen without the need for storing large equipment. Another advantage is that it’s possible to experiment with more expensive ingredients and the successful recipes can then be upscaled if required.
You will need the following equipment:
- Large stock pot - 10 litres is ideal.
- A second pan to heat the sparge water - 6 litres is preferable but it can be smaller - see instructions below
- Mashing/sparging bag
- Measuring jug
- Probe thermometer
- Digital scales that will weigh to the closest gram
- Mash paddle or large spoon.
- Timer
- Colander for sparging and to use later for straining hops - this needs to fit on the rim of the pan to keep your hands free for pouring water over the grain bag.
- Ice packs and grip seal bags. (Or plenty of ice to make an ice bath big enough for the stock pot)
- Hydrometer and trial jar.
- Cleaner Steriliser. It can also be handy to have a small spray bottle of Sodium Percarbonate or No-rinse sanitiser made up for any small cleaning tasks that may be required whilst brewing.
- 5 litre Fermenting Bucket (or larger) and airlock.
- Syphon and bottling equipment.
If you intend to brew this way regularly a portable induction hob is also a good investment. The temperature during mashing can be regulated easily as this hob heats very quickly.
Ingredients for 5 Litres of American Pale Ale with Simcoe hops at around 5.75%:
- 1.3kg Extra Pale Malt
- 150g Munich Malt
- 45g Simcoe Hops - split into one lot of 5g and four of 10g
- US-05 American Ale Yeast
Method
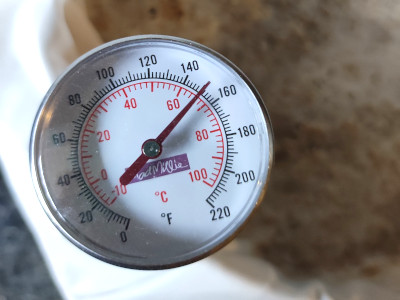
The first stage of making your beer is to ‘mash’ the grains. This involves heating the grains to extract the sugars which would then be fermented. Most of the mashing would be done in a temperature range of 63C - 68C - much higher could lead to astringent flavours in the finished beer.
Start by heating 4.3 litres of water in the 10 litre stock pot to 71C. Carefully place the mashing bag in the pan and secure the top over the rim of the pan so that the bottom of the bag is raised from the base of the pan. This will prevent the grain from scorching on the bottom of the pan.
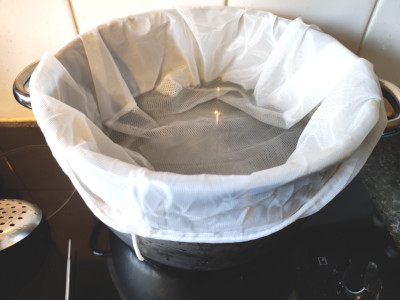
Add the grain into the bag gradually whilst stirring thoroughly with the mash paddle or large spoon.
Once mixed in this should reduce the temperature to around 65C. If below that temperature, warm gently to bring it back to 65C. A temperature of 63-68C then needs to be maintained for an hour. This can be monitored with the probe thermometer.
At this stage the stock pot can be covered to maintain the heat and the temperature checked from time to time to see if it needs to be warmed again if it falls below 63C.
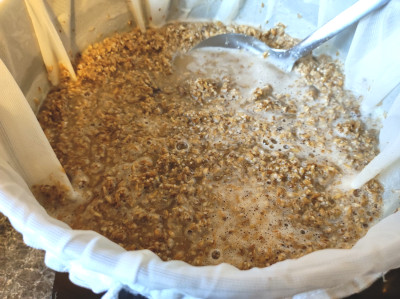
Once this has been held at 63-68C for an hour you can start the process of ‘mashing out’ - Raise the temperature of the grain mixture to 77C and hold it at that temperature for two minutes whilst stirring constantly, so that the mixture is heated evenly.
Whilst ‘mashing out’ you can heat the sparge water which will be used to ‘rinse’ the grains - 4.6 litre at 77C. This may seem like a lot more water than is needed to make 5 litres - it allows for evaporation whilst the hops are being boiled. (If space is limited or you have a smaller pan you can use less water and then add cold water to bring it up to 5 litres after boiling the hops and before fermenting.)
Once you have completed the ‘mashing out’ stage and heated the sparge water you are ready to start sparging (rinsing) the mash to obtain the remaining sugars. It’s helpful to use the colander at this stage. Gently lift the bag of grain out of the water and place this in the colander which should be supported on the rim of the stock pot. The sparge water can then be poured carefully over the mash bag so that it is gathered with the liquid already in the stock pot. Once that has drained remove the colander and mashing bag from the stock pot. The colander will be needed later to strain the hops when pouring the beer into the fermenter.
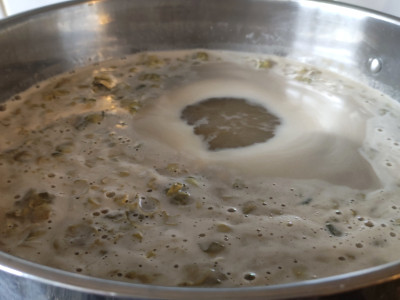
Bring the liquid in the stock pot to the boil. Once it is boiling, start the timer for one hour. It is important at this stage to boil the liquid uncovered as this will prevent off-flavours in the beer.
During this hour the hops will be added into the pan in 5 stages.
- Add 5g of Simcoe hops straight away - this will add the bitterness to the beer.
- Add 10g of Simcoe hops after 45 minutes (15 minutes before the timer ends)
- Add 10g of Simcoe hops after 50 minutes. (10 minutes before the timer ends)
- Add 10g of Simcoe hops after 55 minutes. (5 minutes before the timer ends)
- Add the final 10g of Simcoe hops with 1 minute remaining.
(Whilst the hops are boiling you can sterilise the fermenter, airlock and hydrometer ready for the brew.)
Once the timer has finished remove the pan from the heat.
After boiling you should be left with around 5 litres of liquid as some water will have evaporated. This needs to be cooled to the temperature that the yeast can be added at - around 25C. There are two ways to do this. The simplest way is to place the stock pot in a sink of iced water. The water may need to be changed a few times as the heat transfers to it from the stock pot, so this can be slow. It can be speeded up by having some ice packs sterilised then stored in grip seal bags in the freezer. The bags will keep the ice packs clean so that they are ready to be used directly in the beer. Water frozen in plastic bottles can be used as ice packs.
When the temperature is around 25C transfer it to the sterilised fermenting bucket, using the colander to strain the hops. If less than 5 litres you can add cold water to bring the volume up to 5 litres. (Once the brew is cooled it is important that everything that comes into contact with it has been sterilised as bacterial contamination can produce some off-flavours in the beer.)
Mix the liquid thoroughly with a sterilised spoon and then you can take a hydrometer reading which should be around 1050OG. Add the yeast. Sprinkle this on the top of the liquid - there is no need to stir in. Place the lid on the fermenting bucket and add the airlock.
Ferment at 20-25C for 7-10 days. Cooler temperatures may mean a longer fermentation. Once there are no further signs of fermentation, such as bubbles through the airlock or foam on the surface of the beer, take a sample in a sterilised trial jar and check the gravity with the hydrometer. If 1006 or lower the beer is ready to bottle. 1006 will give an ABV of 5.75%. If fermented to 1004 it would be nearer 6% ABV
When bottling, add a level teaspoon of sugar to each bottle (for 500ml bottles) then leave in a warm, dark place (around 20-25C) for 4 days to allow secondary fermentation and carbonation of the beer. Then move the bottles to a cooler place for the beer to condition.
After 2 weeks the beer should be ready to drink. A small amount of sediment in the bottles is normal. When chilling the beer, if the bottles are left upright and the sediment allowed to settle it’s usually possible to pour the beer leaving the sediment in the bottle.
VARIATIONS
If you prefer an amber beer you could exchange the Munich Malt for Crystal Malt or Caramalt. Darker beers can also be made by substituting a small part of the Munich Malt with roasted grain.
Alternative hops. Simcoe gives aromas of passionfruit and berry. Try Cascade if you like a citrus flavour. If you’d prefer a spicy hop flavour try substituting part of the hop additions with Challenger hops. Or Citra for tropical fruit flavours.